
This Ariticle: https://www.popularwoodworking.com/projects/super-smooth-poly-finish/
By Eric Smith
Polyurethane is a tough, high-quality finish, ideal for tabletops and other surfaces that take a lot of abuse. But no matter how clean your finishing area or how good your brushing technique, a few bubbles, dust particles and streaky spots always manage to sneak into the final coat (Picture 1 below). Directions on the can don’t say anything about it—leaving you to assume a less-than perfect finish must be your own fault. However, the solution is quite simple—rub out the finish with fine sandpaper and synthetic steel wool.
Sanding removes defects and levels ridges. Synthetic steel wool creates an even, silky smooth finish that’s a joy to look at and feel. This age-old two-step technique is commonly used on shellac and lacquer finishes, but it can work well on water and oilbased polyurethane, too. The only drawback with poly is that it is difficult to bring up to a high gloss. If a satin or semi-gloss look is what you’re after, this technique will give you great results.
Sandpaper is used to flatten the finish and remove dust nibs and brush marks. Stearated aluminum-oxide sandpaper is by far the best product for sanding a finish. Stearated paper has dry lubricants that help prevent “corning” or the balling up of finish on the paper. Wet-dry silicon-carbide paper balls up like crazy if you don’t use water as a lubricant. The trouble with wet sanding is the water slurry can make it difficult to see your progress.
I used synthetic steel wool on both water- and oil-based polyurethane. Traditional steel wool is not recommended for water-based finishes; it sheds steel particles that leave a mess and give the user steel wool slivers. Synthetic steel wool pads equivalent to 00 steel wool are widely available at home centers and hardware stores. Fine synthetic wool equivalent to 0000 steel wool is harder to find. I had good luck at auto-body supply stores and mail-order woodworking suppliers (see Sources, below).
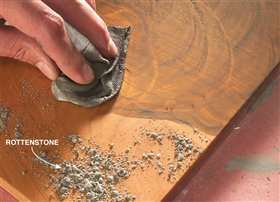
Pumice and rottenstone are sold at some paint stores and at woodworking suppliers. Pumice is ground volcanic glass that comes in grades from 1F (coarse) to 4F (fine). Rottenstone is even finer than 4F pumice. It’s made of ground limestone (see Sources).
Complete Drying Time: https://www.oaklinefloors.net/our-blog/2017/8/31/curing-time-vs-drying-time-what-you-need-to-know-about-both
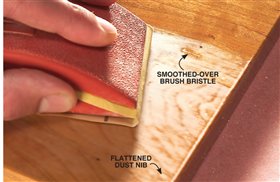
It seems completely counterintuitive, but to make a finish really shine, you have to start by sanding it dull (Picture 2 below). Sanding removes dust nibs and brush marks and leaves the finish smooth and flat.
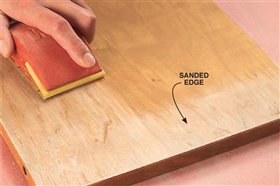
Caution: Finish tends to be thinner at tabletop edges. Use special care in these areas to avoid sanding through (Picture 3 below).
Note: Product availability and prices are subject to change.
Home centers and hardware stores, 3M packs of two finishing pads, 00 steel wool equivalent; Sandblaster 400-grit stearated aluminum oxide paper.
Woodworker’s Supply, woodworker.com, 800-645-9292, Oilfree abrasive wool, fine (000 to 0000 equivalent), #115-271; medium (1 to 00 equivalent), #115-274; 4F pumice stone, 1 lb., #849-832; Rottenstone, 1 lb. #849-839.
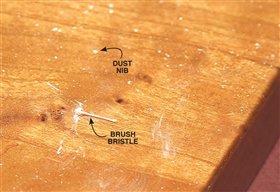
Picture 1: The
Problem: A few dust nibs, broken brush bristles and bubbles
are almost inevitable on big horizontal surfaces finished
with slow-drying polyurethane.
Picture 2: The
Solution: Flatten the surface imperfections with 600-grit
sandpaper on a sanding block (or 400-grit followed by 600 if
the surface is really a mess). Sand just enough to flatten
bubbles, dust nibs and ridges, but don’t try to sand away
all the shiny spots.
Picture 3:
Extra care should be taken when sanding near the edges of
a tabletop to avoid sanding through. Sand the 2 to 3 in.
nearest the edge first. Short strokes make it easier to
control the block. After the edges are done, sand the
centers with long strokes that overlap the sanded
border.
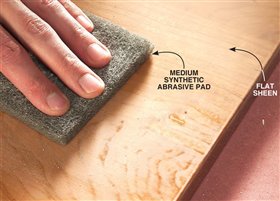
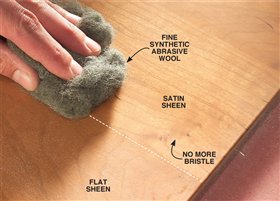
Picture 4: Rub out
the finish using a medium synthetic abrasive pad (00 steel
wool equivalent). Rub until you get a flat, even sheen
across the entire surface.
Picture 5: Switch to
a fine synthetic abrasive wool (0000 steel wool equivalent)
to bring the finish to a satin sheen.
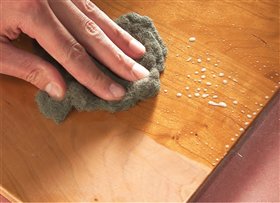
Picture 6: For a
semi-gloss sheen, continue rubbing with fine synthetic
abrasive wool lubricated with soapy water.
Picture 7: Using
finer and finer abrasives brings the sheen closer to a full
gloss. Start with finest-grade (4F) pumice lubricated with
water and a moist rag, followed by rottenstone. With these
finer grits, it’s OK to use a circular motion as you
rub.
Avoid using sandpaper on molded edges, table legs and
other vertical surfaces. The risk of cutting through the
finish with the sandpaper is just too great. Instead,
rub molded edges with synthetic abrasive pads and rub to
the sheen of the top.
This story originally appeared in American Woodworker September 2006, issue #123.
lynchjim.com/Documentation/Household/polyurethane.finish.html