SHARP®
Instructions & Warranty
Thankyou for your purchase of this quality clock. The utmost care has gone into the design and manufacture of your clock. Please read these instructions and store them in a safe place for future reference.
- FEATURES:
- Large 1.4" LED Display
- Dual Alarm
- High or Low Display Brightness
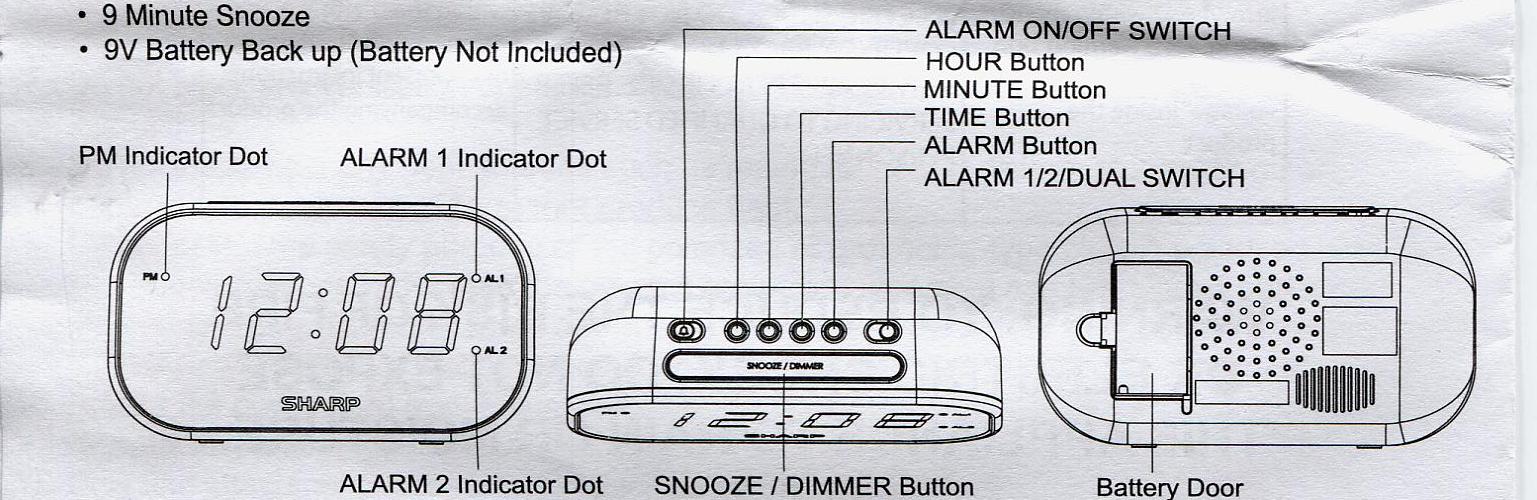
- 9 Minute Snooze
- 9V Battery Back up (Batery Not Included)
- POWER SUPPLY
- Begin by plugging in the power cord into a standard household outlet. The display will flash indicating it needs to be set.
SETTING THE TIME
- Press and hold the TIME button down to activate time setting.
- White holding down the TIME button, press the HOUR button to advance to the correct hour. The PM indicator will light when the hour is advanced into the PM time.
- While holding down the TIME button, press the MINUTE button to advance to the correct minute.
- Release the TIME button when the correct time is shown on the display.
SETTING THE ALARM 1/2
- Slide the ALARM 1/2/DUAL slide switch to ALARM 1/2 position, then press and hold the ALARM button to activate alarm 1/2 setting. The ALARM 1/2 Indicator will light when the alarm 1/2 setting is activated.
- While the ALARM 1/2/DUAL slide switch is on the ALARM 1/2 position and holding down the ALARM button, press the HOUR button to advance to the correct hour. The PM Indicator will light when the hour is advanced into the PM time.
- While the ALARM 1/2/DUAL slide switch is on the ALARM 1/2 position and holding down the ALARM button, press, the MINUTE button to advance to the correct minute.
- Release the ALARM button when the correct alarm 1/2 time is shown on the display.
USING THE ALARM
- Slide the ALARM ON/OFF switch to the ON position, then slide the ALARM 1/2/DUAL slide switch to choose using alarm 1, alarm 2, or dual alarm. The ALARM 1 indicator dot and ALARM2 Indicator dot will be lit according to your choice. The alarm will sound at the preset time.
- Slide the ALARM ON/OFF switch to the OFF position to deactivate the alarm. The Alarm Indicator dot will no longer be visible.
USING THE SNOOZE
- Pressing the SNOOZE/DIMMER button when the wake-up alarm is sounding will cause the alarm to stop and the alarm will sound again in nine minutes. This will happen each time when the SNOOZE/DIMMER button is pressed.
PG 1
USING THE DIMMER
- While the alarm is not sounding, press the SNOOZE/DIMMER button to change the HIGH or LOW seting to control the brightness of the clock display. Note: The default is HIGH setting.
BATTERY BACK UP
- Turn the clock over and insert a 9V battery as indicated to provide battery back up. The battery will hold the ALARM and TIME settings until power is restored. There will be no display under battery power and the ALARM will sound at the correct time. If there is no battery and the power is interrupted, the display will flash 12:00 and the ALARM and the TIME will need to be reset.
CARE OF YOUR CLOCK
- Replace the back up battery annually, or store the clock without a battery when not in use. A soft cloth or a paper towel may be used to clean your clock. Do not use any corrosive cleaner or chemical solutions on the clock. Keep the clock clean and dry to avoid any problems.
For Customer Service
Please Call Toll Free at
1-(800)-224-0131 and ask for
Customer Service at x7546.
Monday-Friday 9:00 AM - 4:00 PM EST
Please call for assistance before returning the clock to the store.
One Year Limited Warranty
M.Z. Berger & Company warrants the original consumer purchaser of this product that it shall be free of defects in materials and workmanship for one year from the purchase date of this product. Defects caused by tampering, improper use, unauthorized modifications or repairs, immersion in water or abuse are not covered by this warranty. If a defect covered by this warranty occurs during the warranty period, wrap your clock carefully and send it to the following address:
MZ Berger Service Center
29-76 Northern Boulevard
Long Island City, NY 11101
You must include a Proof of Purchase, either the original receipt or a photocopy and a check or money order for USD $3.00 to cover the cost of handling. Also include your return address inside the package. M.Z. Berger will repair or replace the clock and return it to you. M.Z. Berger will not be liable for any loss or damage, including incidental or consequential damages of any kind; from any breach of warranty either expressed or implied relatihg to the product. Since some states do not allow the exclusion or limitation of incidental or consequential damages, this limitation may not apply to you.
| Printed in China |
Model SPC597 |
SHARP, registered in the U.S. Patent and Trademark Office. |
PG 2
IMPORTANT SAFETY INSTRUCTIONS
- Read these instructions--All the safety and operating instructions should be read before this product is operated.
- Keep these instructions--The safety and operating instructions should be retained for future reference.
- Heed all warnings--All warnings on the appliance and in the operating instructions should be adhered to.
- Follow all instructions--All operating and use instructions should be followed.
- Do not use this apparatus near water--The appliance should not be used near water or moisture--for example, in a wet basement or near a swimming pool, and the like.
- Clean only with a dry cloth.
- Do not block any ventilation openings. Install in accordance with the manufacture's instructions.
- Do not install near any heat sources such as radiators, heat registers, stoves, or other apparatus (including amplifiers) that produce heat.
- Do not defeat the safety purpose of the polarized or grounding-type plug. A polarized plug has two blades with one wider than the other. A grounding type piug has two blades and a third grounding prong. The wide blade or the third prong are provided for your safety. If the provided plug does not fit into your outlet, consult an electrician for replacement of the obsolete outlet.
- Protect the power cord from being walked on or pinched particularly at the plugs, convenience receptacles, and at the point where they exit from the apparatus.
- Only use attachments/accessories specified by the manufacturer.
- Unplug the apparatus during lightning storms or when unused for long periods of time.
- Refer all servicing to qualified personnel. Servicing is required when the apparatus has been damaged in any way, such as power supply cord or plug is damaged, liquid has been spilled or objects have fallen into the apparatus has been exposed to rain or moisture, does not operate normally, or has been dropped.
- Please keep the unit in a good ventilation environment.
- CAUTION: These servicing instructions are for use by qualified service personnel only. To reduce the risk of electric shock, do not perform any servicing other than that contained in the operating instructions unless you are qualified to do so.
WARNING: The mains plug is used as disconnect device, the disconnect device shall remain readily operable.
Ξ This equipment is a Class II or double insulated electrical appliance. It has been designed in such a way that it does not require a safety connection to electrical earth.
Do not install this equipment in a confined or building-in space such as a book case or similar unit, and remain a well ventilation conditions. The ventilation should not be impeded by covering the ventilation openings with items such as newspaper, table-cloths, curtains etc.
WARNtNG: The apparatus shall not be exposed to dripping or splashing and that objects filled with liquids, such as vases, shall not be placed on apparatus.
Caution: Changes or modifications not expressly approved by the party responsible for compliance could void the user's authority to operate the equipment.
WARNING: The battery shall not be exposed to excessive heat such as sunshine, fire or the like.
PG 3
DIGITAL ALARM CLOCK
|
This lightning flash and arrowhead within the
triangle is a warning sign alerting yu of "dangerous
voltage" inside the product. |
| CAUTION |
RISK OF ELECTRIC SHOCK
DO NOT
OPEN |
CAUTION: TO REDUCE THE RISK OF ELECTRIC SHOCK, DO
NOT REMOVE COVER (ON BACK). NO USER SERVICEABLE
PARTS INSIDE. REFER SERVICING TO QUALIFIED
SERVICE PERSONNEL. |
The exclamation point within the triangle is a warning
sign alerting you of important instructions
accompanying the product. |
WARNING: TO REDUCE THE RISK OF FIRE
OR ELECTRIC SHOCK, DO NOT EXPOSE
THIS APPLIANCE TO RAIN OR MOISTURE.
CAUTION: TO PREVENT ELECTRIC SHOCK DO NOT USE THIS
(POLARIZED) PLUG WITH AN EXTENSION CORD;:RECEPTACLE,:OR
OTHER OUTLE~MSS.::fHEBLADES'CAN BE FUI LY INSERTED
TO PREVENT BLADE EXPOSURE.
Please read this before operating your unit.
This device compiies with Part 15 of the FCC Rules. Operation is subject to the following two conditions: (1) This device may not cause harmful interference, and (2) this device must accept any interference received, including interference that may cause undesired operation.
NOTE: This equipment has been tested and found to comply with the limits for Class B digital
device, pursuant to part 15 of the FCC Rules. These limits are designed to provide reasonable
protection against harmful interference in a residential instal!ation, Thia equipment generates, uses.
and can radiate radio frequency energy and, if not installed and used in accordance with the
instructions, may cause harmful interference to radio communications. However, there is no
guarantee that interference will not occur in a particular installation. If this equipment does cause
harmful interference to radio or television reception, which can be determined by turning the
equipment off and on, the user is encouraged to try to correct the lntetference by one or more of the
following measures:
- Reorient or relocate the receiving antenna.
- Increase the separation between the equipment and the receiver.
- Connect the equipment into an outlet on a circuit different from that to which the receiver is
connected.
- Consult the dealer or an experienced radio/0/ technician for help.
PG 4
|