Equity Auto Set LCD Alarm Clock
Model No. : 40010
OWNER'S MANUAL


- IF THE AUTO TIME IS INCORRECT
- Press and hold DST/SET Button for 5 - 7 seconds.
The year digit will blink.
- Use the (+) (−) Buttons to set the year.
- Press the DST/SET Button again for month & date.
- Use the (+) (−) Buttons to set the month & date.
- Press the DST/SET Button again for hours
(rember AM PM).
- Use the (+) (−) Buttons to set the hour.
- Press the DST/SET Button again for minutes.
- Use the (+) (−) Buttons to set the minute.
- Press the DST/SET Button again to secure in memory.
- ALARM SET
- Press the Alarm Button once.
- Use the (+) (−) Buttons to set the hour (remember AM PM).
- Press the Alarm Button again.
- Use the (+) (−) Buttons to set the minute.
- BATTERY BACK-UP FOR ALARM:
- Install a 9-volt back-up battery for the
Alarm in the rear compartment of the
clock.
- You can install this battery without
disconnecting AC power.
- During a power outage the display will disappear
but the alarm will still work.
- The duration of the back-up battery is
12 hours.
- INSTA-SET BATTERY REPLACEMENT:
- Memory is kept with a 3-volt button cell
battery CR2032.
- This battery should be changed every
2-3 years.
- When changing the battery, the AC power must be on or
the 9-volt battery connected.
- The 3-volt CR2032 battery is found in the
battery compartment under the 9-volt
back-up battery.
- DISPLAYING MONTH, DATE AND YEAR
- Display the Month and Date by
pressing the (+).
- Display the Year by pressing
(−).
- DISPLAYING THE ALARM TIME
- Press the Snooze Button once.
- OPERATING THE ALARM AND SNOOZE
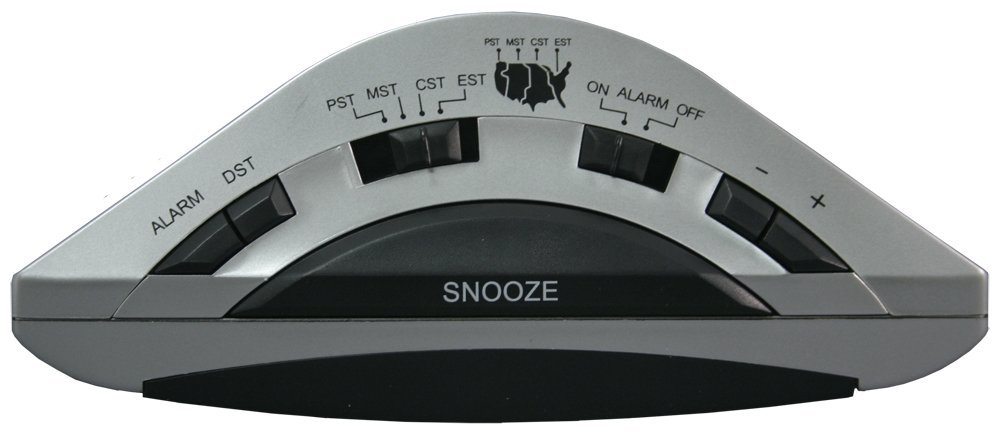
- Activate the Alarm with the switch on top.
- The clock has a crescendo alarm. It will
start softly and increase in loudness and
number of beeps to gently awaken you.
- The Snooze Button get's you an extra 9 minutes
of sleep.
- Use the switch on top to disarm the alarm.
- Turn it back on after a few seconds.
- NO TIME DISPLAYED WHEN PLUGGED INTO AC POWER:
- If the display is blank when plugged into
the AC outlet, open the button cell battery
compartment and press the RESET
button.
- If that does not work:
- Unplug it from AC power.
- Remove the Insta-Set battery
(lithium button cell).
- Plug it into AC power again.
- Manually set the Time
and Date.
- TIME ZONE:
- Please select the proper Time Zone with
the button on the top of the clock. There
are 4 Time Zones available: Pacific, Mountain,
Central and Eastern.
- DAYLIGHT SAVING TIME:
- ON is the default position. If your area
does not observe DST changes, then press and
release the DST button on the top of the clock,
the press the PLUS button to turn DST off.
- D1: Correct for 2007 DST changes.
- d on: + 1 hour manually.
- d of: 0/-1 hour manually.
- TIME/DATE:
- Auto set when you plug the clock in!
 |
|
|